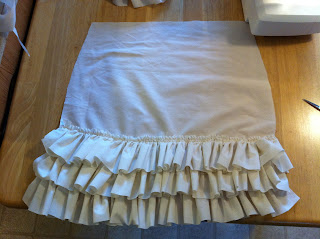
I'm waaaay too stoked that I made this ALL BY MYSELF! My first piece of clothing from scratch! Unbelieveable, I know :)
I started with a sheet I found at a garage sale. It kinda had an antique tinge to it already (which I loved from the start). Don't remember how much it cost (maybe $1?), but it's been sitting in my stash of fabrics that may see the light of day twice a year, and if they're lucky - they'll be made into something spectacular... I'm sure the other fabrics are beyond envious of this sheet. Lucky bloke!
I started with a sheet that had been washed, dried, and ironed out:
I laid my favorite jean skirt down as a pattern. I folded the sheet as well, so that I was cutting through two pieces of fabric (one for the front, and one for the back):
Then I cut around it. NOTE: Please leave yourself at least 1/4-1/2 inch seam allowance for sewing up the sides, and at least 1 inch for the casing at the top. I lazily eyeballed this just because it was early, this was my first time attempting this, I was sick, and I was eager to make it. I did have to modify it in the end. Don't be me :)
Here's my crooked base for the front and back of my skirt (no big deal since it was going to be covered in ruffles):
Since this was a fitted sheet I was working with, I cut the corners off so it would lay flat:
Next, cut strips of fabric for the ruffle. You can make these as wide or as narrow as you want them. I believe I made them 3 inches wide. Also, I folded my sheet in half and then cut it so that the strip of fabric was nice and even. Make the length of the fabric strips at least 2x longer than the width of your skirt.
Set your straight stitch to the longest stitch length:
Sew a straight line at the top of the ruffle. Do this with the remaining pieces of fabric as well:
Tie a knot at one end of the fabric:
At the other end, hold the top thread and push the fabric until it begins to ruffle being careful not to break the thread:
Gradually move the fabric and ruffles down to the end with the knot until the entire piece of fabric is ruffled to your liking. Do this with all the other pieces of fabric as well. I'm pre cutting and sewing some other sheets, so when I have friends over, we can just have a ruffle scrunching party - HA!
Pin your ruffle down beginning at the bottom of the skirt. Leave enough space for you to sew up the seams sides (about 1/4 inch away from the edge on the sides). Since I was in a rush & this was my first experience, I neglected to remember this... It still was okay, but it was just harder to sew up the sides.

Sew your ruffle onto the base of your skirt:


Pin, sew, repeat until you're finished with the front and back.
Needs more... ruffle....
Just one more.... but Remember to leave enough space for your casing at the top
Then take your front and back panels, ruffle sides together, pin, & sew up your side seam (don't mind the pins at the top. I had taken this picture right before I sewed up the casing, then realized I forgot to take a picture of me sewing up the side seams - Oops!) Don't fold over the top when you sew up your side seams. Sew straight up, then pull the top down & make your casing. ALSO BE SURE YOU DON'T SEW YOUR RUFFLES IN THE SEAM! Take careful care and push them away from the seam before you pin & sew.
Then fold down the top & pin a casing for your elastic.
Sew:
Cut a small slit on the inside (not outside of your skirt) of your casing, and thread your elastic through using a safety pin:
I also used some old lace (from who knows what) & sewed it along the top, covering the top of the ruffle for a cleaner look
Pair with some cute boots (or flip flops in the summertime), and you're ready to go into the world looking cute!
Thank my iPhone for the grainy picture. Hey! I never said I was a professional photographer ;)
Pin It


No comments:
Post a Comment